
Today, we will take a look at new tools inside DaVinci Resolve Studio that help improve efficiency in the early stages of your editing workflow.
The other day, I heard an interesting quote from someone discussing the recent barrage of AI advancements. AI is a complicated issue and is not the subject of today’s article, but because a couple of the enhancements I’ll discuss today fall under the AI tools category, I thought it worth a minor prelude. The man compared the term "AI" to the term "transportation." The term "transportation" covers a lot of different things—from a bicycle to a boat, from a subway to a spaceship—a lot of things are technically transportation. But they all mean different things and have different variables. I mention that because the term "AI" also has many connotations. Some engender better feelings than others, as I’ve written extensively about in the past. But in the case of the AI tools included in DaVinci Resolve Studio 20 that I’m discussing today, these feel very much like efficiency improvements that fit into an existing workflow rather than replace it. So, I thought you might like to know what can be done.
IntelliScript
I am a writer/director of scripted narrative. So, after I’m done spending weeks/months/years perfecting my script, then get it in front of actors to bring those words to life on screen, the next thing up is cutting all those gazillion takes together to find out if the words I spent so long writing were really worth the ink. The first cut of any film is known as a rough assembly. And I believe "rough" is a key word to remember. At this point in the editing process, it’s less about making sure everything is perfect and more about lining things up to make sure that I: A) have all the ingredients necessary to make the scene, and B) they line up correctly as I envisioned on the page. In other words, we are still a very, very long way from the finished product.
Doing your initial rough assembly is a fairly tedious process. Everyone has their method. But for me, I want to go line by line to know every single small inflection and accent I have available to me over the course of the multiple takes and angles I’ve shot for a scene. I don’t want to miss anything. So, it can take hours/days/weeks to get through this process depending on the amount of footage I need to review and assemble. The new IntelliScript feature in DaVinci Resolve Studio 20 (Studio version only) essentially promises to do this early grunt work for you to get your clips arranged onto a timeline so that you can begin your more creative editing process.
First, let’s show you how this is supposed to work, then I’ll get into how well it works. The process is fairly straightforward.
Import your clips into your project.

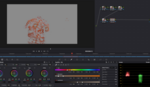
Right-click in the media bin on all the clips you shot for that scene. Select AI Tools > Audio Transcription > Transcribe. This process will listen to all of your clips and transcribe the audio into text form. (Note: This same process is how you would generate audio transcriptions for things like client interviews should they request them in print.)
![]()
Once your clips have been transcribed, select the clips again on the Edit page. Very important—as I wasted about a half hour trying to figure this out—make sure you are on the Edit page for this and not the Media page, as your options there will be different. But once on the Edit page, select the already transcribed clips you want to consider for your timeline, then Right-click > AI Tools > Create New Timeline Using IntelliScript…

This will bring up another window. In this window, you will import your script. In my case, I write in Final Draft, so I have to export my script from Final Draft as a .txt file (not an .fdx file). Also important to note: don’t export a rich text file (.rtf). Export a regular .txt file.

The software will then "read" the script I’ve imported and match that to the transcribed text of the individual clips. It will then do its best to align those clips on a timeline in the order they are written in your original script. If you have multiple takes/angles from the same scene, it will layer those clips vertically on your timeline with the "best take" being on the bottom layer and the alt takes stacked on top. Those alt clips will be initially disabled (both audio and video) so that you can play your timeline through smoothly.

Now, I’m not 100% sure how it decides on the "best take." No doubt you are going to want to go back and review every take individually regardless. But this does do some of the initial grunt work of lining everything up. If you don’t agree on the "best take" and want to review the disabled stacked clips, just select the clip and either hit D on the keyboard or Right-click > Enable Clip on the timeline.
And voila. That’s pretty much it. Just like that, you have a rough assembly. You still have plenty of actual editing ahead of you. But the raw material is in place.
Does It Work?
Now, the obvious question: How well does it actually work? Well, I’ve only just started testing it out, so I haven’t put it through every situation yet, but so far, the answer is mostly "yes." There are a few caveats, which I’ll get to next, but I could absolutely see this becoming an early part of my workflow.
First caveat you need to keep in mind is that this is a very rough assembly. This is not actual editing. You are still going to need to go through to finesse your timing, flow, and all the other aspects of editing that make it the secret sauce of any well-told story. The AI tools are not going to replace the skills of an actual editor. Editing is an art in itself. At best, it will take over some of the more menial tasks of finding clips and lining them up that might have previously been delegated to an assistant. But you definitely should not expect Dede Allen levels of craftsmanship here. This tool saves you time. But it doesn’t replace skill.
Now, to be fair, I intentionally gave it a very difficult task. I pulled some raw clips from my latest film, Stunted. The comedy short has three characters. And while the final film, which just began its festival run, sticks fairly close to my original screenplay, I was also gifted with talented actors with a gift for ad-lib. So the lines on the page weren’t always 100% the words that came out of their mouths. Still, the IntelliScript function did a pretty solid job of following the gist of the script and incorporating alt takes as options in the rough assembly. In other words, it was able to discern a sense of the context. There were a few wild lines that I don’t think it knew what to do with that ended up crammed into the assembly in unexpected places. But again, this is a simple fix. Once things are on the timeline, you can change and edit them at will. So, I can excuse it for not always making the right choice the first time around.
It’s important to note that this is cutting based on dialogue. You wouldn’t necessarily feed it a 20-minute action scene and expect it to cut it into Spielberg’s Normandy landing while you sit down for lunch. In fact, I think its best usage would be for scripted material delivered straight to camera—maybe something like a YouTube video or a promo piece. I could see using this for my video essays on my Moveable Canvas YouTube channel. I’m always doing multiple takes, and this would be a very efficient way of lining everything up based on what I wrote quickly and efficiently before I come in to do the fine tuning.
Tracking Characters Using Face Recognition and Smart Bins
One related tool that I think deserves mentioning here is the Analyze Clips for People feature inside Resolve Studio 20. Essentially, this has Resolve analyze your footage for specific actors so that you can quickly and easily identify who is in each scene and how much screen time you are giving them.
The process is fairly simple:
Right-click > AI Tools > Analyze Clips for People.

Give each face a name.

This will add a name to the People category on each clips Metadata.

This should automatically create Smart Bins for each character.
 Note: If it doesn’t, be sure to go into Preferences > User > Editing and make sure that Automatic Smart Bins for People Metadata is turned on.

You now have a smart bin displaying every clip that contains that person’s face.

One trick you can then use is to color-code those clips. In this example, I’ve color-coded the Sophie character as lime.

Then, when you look back at your timeline, you will see a color-coded timeline that corresponds to when that person is on screen. Again, this could be crucial for tracking character development across your project—or simply to keep your star happy.

Both of these tools are very useful at offloading some of the more mundane tasks that come in the early stages of editing when trying to keep yourself organized for the work to come. Neither replaces the need for human intervention, but both should save you some time in the early phases and, hopefully, get you to the fun part just that little bit quicker.


Thanks for this inside look. Definitely helpful.