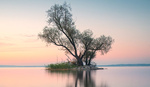
Strikingly deep blue skies can transform your landscape photos from good to captivating. Here's a technique to ensure your images have a more vivid and professional feel.
Coming to you from Christian Möhrle - The Phlog Photography, this practical video explores a nuanced but straightforward method to enhance your skies using Photoshop’s selective color adjustment layer. Möhrle demonstrates first how basic adjustments like tweaking the Adobe landscape profile and carefully controlling highlights, shadows, and clarity build a strong foundation. Understanding how to selectively deepen shadows and enhance highlights without flattening your image’s depth is critical. This targeted approach to exposure and masking creates a convincing three-dimensional look.
Möhrle emphasizes a thoughtful balance in adjusting color tones, cautioning that overly intense blues often appear unnatural. He illustrates exactly how the selective color adjustment layer grants precision in fine-tuning hues and luminance, effectively controlling intensity without sacrificing realism. Through slight adjustments of the cyan, magenta, and yellow sliders, the sky transitions smoothly from overly saturated to natural-looking and visually appealing. Recognizing the limits of certain adjustments, Möhrle guides you away from common pitfalls such as excessive clarity or contrast, encouraging subtle shifts to achieve more authentic outcomes.
An especially useful takeaway from the video is Möhrle's insight into managing cyan and magenta tones separately, ensuring a nuanced control over skies often overlooked in simpler editing techniques. He provides valuable guidance on preserving the integrity of cloud textures and maintaining a realistic atmosphere, improving your overall image subtly but significantly. Additionally, he shows how creating a reusable preset saves time for future edits. This preset strategy can be particularly beneficial if you often photograph similar outdoor scenes or conditions.
The video also briefly touches upon how you can utilize Photoshop’s masking and gradients strategically to further enrich depth and emphasize specific areas within your composition. By creating controlled highlights and shadows through gradients, Möhrle illustrates the power of selective editing. His step-by-step explanation ensures even newcomers to Photoshop can grasp and implement the methods without feeling overwhelmed. Check out the video above for the full rundown from Möhrle.
And if you really want to dive into landscape photography, check out our latest tutorial, "Photographing the World: Japan II - Discovering Hidden Gems with Elia Locardi!”