Filters are tools that improve landscape photography by controlling light and enhancing details. They help balance exposure, reduce glare, and boost colors in ways cameras alone can’t. This video and article explain how to use graduated neutral density (ND) filters, polarizers, and UV filters effectively, with practical examples to show their impact.
Before we go any further, I have been using filters from nearly all the main brands for many years, and while each has its own strengths, I am not going to mention any brands in this piece. Instead, I want to give you the tools you need to use whatever brand of filters you choose to use or even get in the future.
Why Filters Matter
Cameras struggle with high-contrast scenes, like a bright sky above a dark forest or reflections off water. Filters solve these problems at the lens, saving time in post-processing and preserving image quality. Unlike editing, filters work with raw data in real time, avoiding artifacts from heavy adjustments. Three types stand out for landscapes: graduated ND filters, polarizers, and UV filters. Each has a specific purpose and method.
Graduated Neutral Density (ND) Filters
Graduated ND filters darken part of the frame, usually the sky, while leaving the rest unchanged. They’re essential when the sky is much brighter than the land, common at sunrise or sunset.
These filters come in strengths (e.g., 1-stop, 2-stop, 3-stop) and transitions (soft, medium, hard). A 2-stop filter reduces light by two f-stops in its dark zone; a hard transition shifts quickly from dark to clear, suiting flat horizons like oceans, while a soft edge works for uneven ones like mountains.
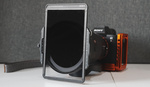
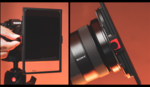
To use one, mount it on a filter holder (e.g., Lee or NiSi systems) attached to your lens. Look through the viewfinder or live view, then slide the filter until the dark section covers the bright sky, aligning the transition with the horizon. Meter exposure without the filter first, say, 1/60 s at f/11, then add the filter and adjust shutter speed (e.g., to 1/15 s for a 2-stop ND). Check the LCD: the sky should retain detail without overexposing, and the land shouldn’t darken unnaturally.
Example: Photographing a desert sunset with a blazing sky and shadowed dunes. Without a filter, the sky washes out at 1/125 s, f/11, ISO 100. Add a 3-stop hard-edge graduated ND filter, slide it over the sky, and shoot at 1/30 s. The sky keeps its orange hues, and the dunes stay clear with no blown highlights.
It's important to run many tests with your filters; stacking too many (e.g., ND + polarizer) may vignette wide angle lenses (16mm or wider). I personally use a filter set that is larger than the diameter of my lens; this prevents any vignette from occurring.
A step I see many forget is to clean them during and after use; sand or salt ruins coatings and can result in scratches, which you will forever be looking at when you use them from then on. Of course, a microfiber cloth is key here, but should you have sand on the glass and you start cleaning, you know what the result will be, right?

Full ND Filters
Full neutral density (ND) filters reduce the amount of light entering the lens evenly across the frame. They allow you to use slower shutter speeds or wider apertures in bright conditions without overexposing the image. This makes them ideal for creating motion blur in waterfalls, rivers, or clouds, and for achieving shallow depth of field in strong sunlight.
ND filters come in different strengths, measured in stops. Common options are 3-stop (ND8), 6-stop (ND64), and 10-stop (ND1000). The higher the stop number, the darker the filter and the longer the exposure you can use. For example, a 10-stop ND lets you extend shutter speeds from fractions of a second to several seconds or even minutes.
When using a full ND filter, it’s important to meter carefully. Because the filter reduces light significantly, autofocus and exposure meters may struggle, so using manual focus and/or bracketing exposures can help. Also, long exposures require a tripod to keep the camera steady, but I guess you will already know that.
One thing to watch for is color cast, which some ND filters can introduce. Higher-quality filters minimize this, but you may still need to correct it in post-processing. Overall, full NDs are essential for creative control over exposure and motion in landscape photography.
 Polarizing Filters
Polarizers cut glare and boost color saturation, making skies bluer and foliage greener. They work by filtering scattered light, especially reflections off water, leaves, or wet rocks.
Circular polarizers (CPLs) are pretty standard. They screw onto your lens or filter holder depending on brand. Plus, you also have a magnetic option (my personal favorite), and then you rotate it to adjust the effect. To use one, attach it, then turn it while watching the viewfinder. The effect peaks at a 90-degree angle to the sun—point your thumb at the sun and extend your fingers; the filter works best along that line. You’ll see glare fade and colors deepen. Stop rotating when it looks right; overdoing it darkens skies unnaturally and can also leave you with a section of the sky that you will struggle to fix later in post-processing.
Polarizers reduce light by 1–2 stops, depending on the manufacturer, so adjust exposure accordingly. At f/8, 1/250 s, ISO 100 without a filter, you might need 1/125 s or 1/60 s with it. Test your filter to see what strength it produces. It's important to note that they’re useless at night or when facing the sun directly, as the glare doesn’t polarize them.
Example: Shooting a lake with a cloudy sky reflecting on the surface. Without a polarizer, the water mirrors the gray clouds, flattening the scene. Add a CPL, rotate it 90 degrees from the sun, and shoot at f/11, 1/100 s, ISO 100. Reflections vanish, revealing the lakebed, and the sky’s blue intensifies. For a forest, the same setup cuts leaf sheen, enriching greens.
An important point to note is that you may have to avoid wide angle lenses below 20mm, as polarizers can unevenly darken skies, creating bands. So, check edges in live view when you are shooting, and just like all filters, clean fingerprints off, as they smear easily.
UV Filters
UV filters block ultraviolet light, which can haze distant landscapes, especially at high altitudes. They also protect your lens from dust or scratches, but there is a valid train of thought that adding this glass to the front of your lens will ultimately risk losing quality, which does make sense in a way. We spend a lot of money on high-quality glass, to then put a $50 piece of glass in the way. Some modern sensors already filter UV, I believe, so their effect is subtle, but if you want to use one, then think clearer mountains or sharper horizons.
Screw a UV filter onto your lens and leave it on. It doesn’t change exposure settings, no adjustments needed. Test it at elevation: at sea level, haze is minimal, but at 10,000 feet, distant peaks gain definition.
Example: In the mountains, a UV filter at f/11, 1/200 s, ISO 100 sharpens a far ridge against a blue sky, cutting faint haze.
Don’t stack UV filters with others unless necessary—multiple layers degrade quality or flare in bright light. Buy quality (e.g., B+W or Hoya)—cheap ones soften images, as mentioned above.
Personally, I no longer use a UV filter, but wanted to cover it in this article so you can make your own decision.
 Using Filters in the Field: A Practical Walkthrough
When I’m out on location, filters aren’t an afterthought; they’re part of the process. Here’s how I tend to approach them step by step, without overcomplicating things.
- Start by reading the scene: If the sky looks much brighter than the land, I know I’ll need a graduated ND to hold detail in the highlights. If there’s glare bouncing off water or pale colors looking washed out, that’s when a polarizer earns its place. And for distant haze, particularly in summer light, I sometimes reach for a UV filter, though its effect is subtle.
- Getting set up: I mount the filter next. For grads, if you use a holder system that lets you slide and position the filter accurately, then take your time with that. Polarizers and UVs are generally screw-on types, so thread those in gently, tight enough to hold, but not so tight they get stuck. I now use a magnetic system, which makes it far quicker.
- Metering before you filter: Before any filter goes on, I’ll take a quick reading, say, something like 1/250 s at f/11, ISO 100, as a baseline. Then, I add the filter and compensate. For a 2-stop ND, I’ll usually slow the shutter down two stops, in this case to 1/60 s. If that’s too slow for wind or movement, I’ll adjust ISO instead.
- Making adjustments on the spot: Once it’s in place, I tweak in real time. Graduated NDs get positioned to match the horizon or transition line. Polarizers are rotated until the effect is strongest, glare reduced, colors deepened. I use live view and check the histogram regularly, especially to avoid clipping highlights in the sky.
- Taking the shot and reviewing: After firing the shot, I zoom in on the LCD. If the sky looks unnaturally dark, I’ll dial exposure up slightly. If the colors feel muted, I’ll rotate the polarizer again to see if I missed the sweet spot. The important part is making the adjustments in the field.
A real-world example: Midday at a coastal cliff, harsh light, reflective waves, and a sky that risks blowing out. I meter at 1/500 s, f/8, ISO 100. I then add a 2-stop soft-edge grad over the sky and slow the shutter to 1/125 s. A polarizer goes on next, rotated until the water glare disappears. The result? Balanced exposure between the sky and cliff, and the ocean shifts from a flat gray to a clean teal.
Combining Filters
You can stack filters for combined effects, but use them sparingly. For example, a graduated ND and polarizer together can balance a sunset and deepen colors. Think of a mountain lake at dusk, using a 2-stop ND over the sky (1/30 s, f/11, ISO 100) with a polarizer to cut water glare. This keeps the clouds in the sky visible while revealing the rocks beneath the lake’s surface. I would advise against adding a UV filter here since three layers increase the risk of flare or softness, of course, depending on the quality of your chosen filters.
It’s best to use a holder system when stacking filters. Screw-on filters tend to misalign easily and can ruin threads. Also, watch for vignetting on wide lenses like 16mm. If this happens, step up to a larger filter size, such as a 100mm system. For me now, I use a magnetic system, which helps avoid these challenges.
Maintenance and Troubleshooting
Filters get dirty quickly, so clean them with a microfiber cloth and lens solution. Any scratches will ruin shots—not only on the day but forever more—so store your filters in protective cases and not in a pocket. If you notice colors shifting, like purple skies, your polarizer is likely too strong, so reduce the rotation. Dark corners in your images usually mean vignetting; try removing one filter or zooming in slightly. If your filter isn’t making a difference, check that it’s the right type for the situation; a 1-stop ND won’t handle a bright sun.
When Filters Aren’t Needed
It’s recommended to skip filters in low-contrast scenes, such as overcast forests, where they add little benefit. At night, polarizers and NDs dim stars without benefit, so keep them in your bag and always test without filters first. Sometimes, minor fixes are better handled in post-processing.
Filters enhance landscape photography practically and efficiently. Graduated NDs balance exposure, polarizers cut glare and boost colors, and UV filters reduce haze while protecting your lens. Learn their strengths: use a 3-stop ND for sunsets, a CPL for reflective rivers, and a UV filter for alpine views. Meter, adjust, and review each shot. With practice, filters become second nature, helping you deliver sharper, richer images straight from the camera.
Personal Note
The information here is a balanced approach to using filters, and the different methods and systems mentioned are the most popular options. That said, there are two points to keep in mind. First, almost all these effects can be replicated in post-processing, except for the polarizer, which remains unique in cutting glare and reflections. So, if you prefer to bracket your shots and edit later, that’s a valid approach. Second, I currently use a magnetic filter system, as mentioned throughout, which I find much easier to handle and more convenient, as it reduces the amount I carry in my bag. I’d be interested to know which filter system you use.
Thanks for reading. Let's continue the conversation in the comments below.


I'm a Nisi guy ... the reason I used those filters is they are easy to keep clean and pretty sketch resistant. I'm still using the square drop-in ones 100 mm x 100 mm. I don't like the magnetic ones. They came out with. I still think with circular filters you get a bit of vignetting if you hold a circular filter up to the light like a torch you will see that it's darker on the edges however with the square filters because of the way the glass is cut and I'm only guessing this that the darkness is even across the piece of glass. I don't know why but when I look at circular filters they look darker on the edge.... they are a lot of fun to play with. My favourite is my three stop ND
That’s a great image! I use a 95mm circular which is larger than most of my lenses and get no vignetting, I’ve not noticed any darkening on the actual filter itself to be honest. I’ve used those exact filters you have and they were great but I’ve had too many filter foundation kits pop off my lens in the field so moved to magnetic
it's funnier. I have a bit of an inversion to a lot of camera gear because they're all designing stuff to make it quicker and faster to take things off and on when I'm out shooting landscapes I'm not in a rush. I don't need my filter to take two seconds less to put on. I seriously don't. I take my time and chill and that's when I take my best photos. The whole magnetic idea I just don't understand it. I really don't.