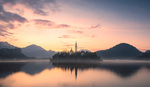
Want to give your landscape shots a distinctive look? Check out this helpful video tutorial on easily color-grading your photos in Lightroom.
Coming to you from Christian Möhrle - The Phlog Photography, this detailed video gives a clear, step-by-step outline of how to achieve a bright, desert-style color effect entirely within Lightroom. Möhrle begins by selecting the Adobe Landscape profile, a choice that deepens the natural yellow tones in the mountain highlights. Adjusting highlights and shadows separately allows you to brighten the image without overexposing it, while retaining rich details in darker areas of the photo. Möhrle uses the highlights, whites, and blacks controls specifically—taking care not to clip any tones—to achieve an inviting, soft visual quality that avoids harsh contrasts. Being strategic about where you place brightness and shadow lets you subtly direct viewers' attention to the focal points in your composition.
One particularly useful section of the video is Möhrle's explanation of careful masking techniques. Masking helps you make targeted enhancements within the frame and lets you control exactly where adjustments are applied, which is crucial to making a brighter but realistic look. Möhrle demonstrates how to use linear gradients and object selection tools in Lightroom to ensure adjustments affect only specific areas, like darkening corners or enhancing selective brightness in the sky. His addition of a subtle, angled light ray using masking techniques shows how realistically you can simulate natural lighting conditions to add depth and interest to your shots. Mastering masking skills like these gives you greater flexibility over your final image outcomes.
Möhrle also spends time on nuanced, targeted color grading adjustments, demonstrating the effectiveness of Lightroom’s color mixer and split toning panels. Instead of making wholesale changes, he individually fine-tunes saturation levels of blues, yellows, and oranges, carefully balancing a warmer and inviting palette without artificiality. His use of split toning further builds on warming tones independently in highlights, midtones, and shadows. This is particularly interesting because he chooses warm tones even in shadows rather than the usual approach of adding cool hues, ultimately maintaining a calm, uniform warmth across the photo.
Learning Möhrle's sharpening process provides additional value for refining your own workflow. He explains how to correctly set the radius, detail, and masking sliders—particularly how the Alt-key masking preview accurately targets detail sharpening exactly where you need it without increasing noise. His method for quickly cleaning up sensor spots using Lightroom’s visualize spots tool also offers valuable advice that streamlines a sometimes tedious task. Check out the video above for the full rundown from Möhrle.
And if you really want to dive into landscape photography, check out our latest tutorial, "Photographing the World: Japan II - Discovering Hidden Gems with Elia Locardi!”