
Always photograph with the end in mind. Make life easier for the guy in the darkroom, or the person in Lightroom—usually you.
A thing I learned very early on in my photographic career was that if I always tried to create my photographs with the end in mind, not only would life be easier on the back end when I printed my images, the image quality would improve as well. That being the case, how do I do that? Planning is a big part of it. What do you want to do? What is the best time of the year, time of day? What tools will you need to have available? And don't forget sleeping bags and tents if you're going to be backpacking or camping.

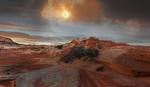
For this image, and because I knew that the hike would be about 4 1/2 hours over very rough terrain, I planned to walk out of base camp just before 5:00 AM, while it was still dark. Knowing that there was a huge sandstone wall between my subject and the sun, I knew that I would have about an extra hour of time before raw sunlight got into the basin. Waiting any later would mean that the normal breezes that happen around sunrise could cause there to be wrinkles on the water’s surface, which would destroy the desired mirror-like surface of the water. BTW, this was done on an early November morning.
I read a quote by Mies van der Rohe that applies: "God is in the details." It shows the importance of paying close attention to the finer points of a project or task—a photograph in this case—as these details are crucial to its overall success and quality. Real excellence lies in the meticulous effort put into the smaller aspects of our work.

Paying attention to details is essential. This image, Angel Arch, was one of the very first images I made when I began aspiring to make fine art photography my career path. I had very little idea what I was doing, but I had been reading Ansel Adams’ book The Negative, and had read that some great photographers used Tri-X Ortho film, so I ordered a box of it and loaded up some film holders. My son, a good friend, and I drove off to Canyonlands. At that time, it was possible—and legal—to drive your vehicle right to the base of this structure, so we did. The big regret I have is that I selected a very poor film for this purpose. It has a very heavy grain pattern, and so it marred what I think is a spectacular image. So plan your media, whatever that happens to be.
Watch the Edges
As you are composing an image in the field, looking through your camera back—this could also mean the viewfinder of your camera—begin looking for things that are out of place with the image you hope to print in your darkroom or using your inkjet printer.

Look for Distractions on the Edges
This image was very difficult because there was so much material along the edges of the scene I wanted to portray. So I had to be very careful and very strategic about the edges—what I would include and what I would delete. It's best to do that in camera rather than later in the darkroom or Lightroom.
So many times, I have looked carefully at the ground glass of my camera only to see something that clearly should not be there. Some inconsiderate hiker left a cigarette butt on the ground, or worse—a dirty Pampers! Step into your composition and remove the distracting or offending item. I have tried to make it a habit to carry along a plastic trash bag to carry those things out, so I would remove them from the scene and pack them out. Another common thing is what I call intrusions—maybe a weed that has died in the foreground and is sticking up proud and strong in the immediate foreground. Also, look for tree branches on the edge that will be a distraction. I carry some bungee cords in my pack so I can tie them back while the exposure is being made and then release them when I am done. I have no heartburn about cutting it down or pulling it out or bending it over. It’s much, much easier to deal with it here, in the field, than it is to deal with it later in print spotting or in Photoshop. Plus, you leave it better than you found it, so the next traveler can enjoy the outdoors.

Look for Interesting Texture
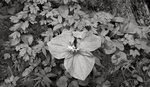
One of my favorite things to do is to try to contrast textures. In this image, One Seed Juniper, Arches National Park, I was attracted by the way the branches splayed at different angles, in contrast to the other branches. Also, by the contrasting texture of the bark against the needles and berries of the juniper plant and against the texture of the sandstone it was growing out of.
It is texture that gives a photograph a tactile feel, almost as if you could touch the bark in the photograph and feel its rough skin.
Plan Your Time and Plan Your Exposure

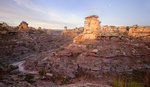
In this photograph, Sunlit Castle, Capitol Reef National Park, I knew that there would be direct sunlight on this structure about an hour before sundown, so I planned on being there, and in position, when that happened. What I didn't know at the time was that the canyon wall in the background would cooperate so thoroughly in the production of the photograph I had in mind, since I wasn't completely sure how the angle of the sun would relate to the mouth of the canyon. With it falling into shadow, as it did, the statement was pretty complete. I wanted the reflected light off the rocks at the top to be around 250 when using the Photoshop Info tool. (Bear in mind that there are 256 available tones, so I wanted them to be light enough to just barely hold detail. Any lighter and they go to white with no detail.)

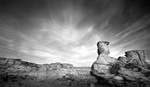
This was an interesting photograph to get. I knew what I wanted—what I had seen in my imagination. Finding the right spot was the challenge. There are no roads here; it's just cross-country, and there were hundreds of motorcycle tracks. What I wanted to do was to find a spot that had fewer motorcycle tracks and then to make the exposure while the sun had just kissed the top of the mesa, before it began revealing the scars that the land bore. I wanted the lightest portion of the image to print as a Zone VII, with the shadows falling to Zone III. What that translates to for the digital photographer is about 250 when measured with the Info tool in Photoshop and for the darkest areas of the foreground to come in at about 45–50. What made it even more interesting when it is printed is that there were two layers of clouds blowing in different directions, so they painted in as more interesting and unexpected sky texture.
The lead photograph for this image was made as I was driving out of Shiprock, New Mexico, to Thoreau, New Mexico. As I came over a rise in the highway, I could see a funnel cloud—a gustnado—touching down very near Bennet’s Peak, which is a volcanic protrusion a few miles south of the Shiprock formation that New Mexico is known for. Of course, by the time I could get there and get set up, it had dissipated, but still there was a very interesting cloud structure.
I purchase all my expendable supplies at B&H Photo Video in New York City. Good people, and I highly recommend them.


Nathan, nice article and some of your best photographs you've presented to date!
Thanks.